Contents
Instance[]
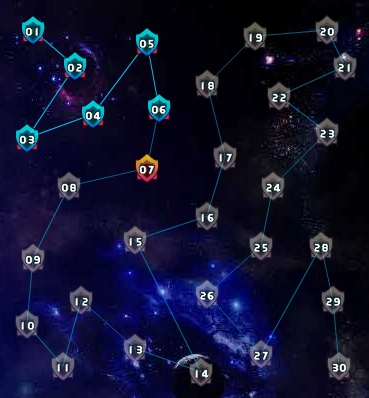
Instance Map
Instances are a very important aspect to the player. Here players fight against enemy A.I. ships to win Treasure Boxes that will either contain a prize of resources or a set of Blueprints.
Each Instance provides different challenges which get progressivly tougher at higher levels. However, completion of higher levels yeild better rewards than lower levels.
Blueprints are level dependent meaning that only specific Blueprints can be aquired at certain levels.
Unfortunately the game designers have neglected to provide any real explanation as to how one can 'win' each battle. However, almost all normal instance enemy ships are available for sale through your corps mall , thus you can preview those ships and figure out how to beat them. Most enemy mall ships are glass cannons (ie. they have weak shields, but a big weapon).
In normal instances, enemy Missile fleets will attack your fleet having the strongest total attack rating and enemy Ship-Based fleets will attack your fleet with the highest total durability rating. Enemy Ballistic and Directional fleets are usually set to attack closest. Thus it will be useful to form fleets that are meant to lure enemy fire from missiles or fighters, comprised of ships designed as specific counters to those threats. For example, having high shields combined with fighter interception modules is a good idea. Or using missile interception modules and Nano or Neutralizing armor in fleets with your biggest guns is also important. Having kinetic, heat and magnetic shielding modules with Regen or Chrome armor is important for ships likely to be engaged against enemy ballistic/directional fleets.
The order in which you activate each fleet when setting up the instance in your space station determines the starting position of that fleet. The first fleet you choose to participate will be in position #1, the second in position #2, etc. Order can be useful in certain instances, where some start positions are more exposed to enemy fire than others.
In general the enemy mall ships have high movement rates. This means it is impractical to build fleets that can "outrun" them. Really all you need is a fleet speed that can get you to within your weapon's effective range so you can shoot back. As a genral rule, this means having speed + your maxium weapon range = 10 (ie. you can catch up to and shoot at an enemy fleet that uses ship-based weapons). However, be aware that slow fleets armed with missiles or ship-based weapons won't be able to shoot at nearby enemies unless they can move far enough away to put the enemy at 'minimum' range. Using two fleets in tandem can overcome these obstacles, for example a 'slow' fleet designed to tank damage and a 'fast' fleet designed to attack enemies.
While at the start you should be concentrating on building up your Logistics Construction Science tech levels, once you begin doing instances you should at least go after the low-hanging fruit in both weapons and shield tech. The first few tech levels in each category are quite inexpensive and quick to research. Once your economic tech is maxed-out, research the top row of Ship Defense Science , as this will help reduce your He3 expenditures in the instances. Then choose your prefered weapon type (generally its recommended to start with Ballistics Science or Directional Science ) and research till you get scatter/piercing damage tech.
[Instance Viewer][]
The following [[1]] is an interactive view of all of the instances, ships and information. A very useful tool.
Normal Instances[]
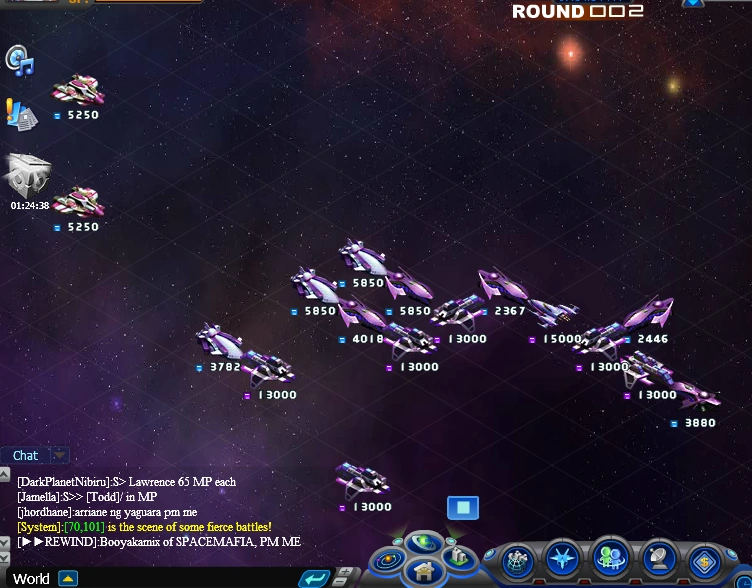
Pirates from Instance 28 scramble.
| Instance Level | Name | Max Fleets | Checkpoints | EXP | Reward | |
|---|---|---|---|---|---|---|
| 1 | Ancestral Recall | 3 | 1 | 180 | ||
| 2 | Deadzone | 4 | 1 | 500 | ||
| 3 | Bravery | 4 | 1 | 1,000 | ||
| 4 | Ambush | 5 | 1 | 1,540 | ||
| 5 | Defending Yourself | 5 | 1 | 1,820 | ||
| 6 | To Victory | 6 | 1 | 2,310 | ||
| 7 | Annihilation | 8 | 1 | 3,220 | ||
| 8 | Hellish Ventures | 8 | 1 | 4,340 | ||
| 9 | Duel | 8 | 1 | 5,250 | ||
| 10 | Lost | 10 | 1 | 6,300 | ||
| 11 | Wonderland | 10 | 1 | 8,400 | ||
| 12 | Dead or Alive | 10 | 1 | 10,500 | ||
| 13 | Ship Graveyard | 10 | 1 | 14,000 | ||
| 14 | E.C.R | 10 | 1 | 17,500 | ||
| 15 | Free Flight | 12 | 1 | 21,000 | ||
| 16 | Spell Break | 12 | 1 | 24,500 | ||
| 17 | Lucky Zodiac | 12 | 1 | 28,000 | ||
| 18 | The Blackest Hole | 12 | 1 | 31,500 | ||
| 19 | The Matrix Returned | 12 | 1 | 35,000 | ||
| 20 | Timewhirl | 12 | 1 | 38,500 | ||
| 21 | Bushwhacked | 15 | 1 | 42,000 | ||
| 22 | The Gathering | 15 | 1 | 45,500 | ||
| 23 | Saving Grace | 15 | 1 | 49,000 | ||
| 24 | Prowler | 15 | 1 | 52,500 | ||
| 25 | Faceoff-I | 15 | 1 | 56,000 | ||
| 26 | Faceoff-II | 15 | 1 | 59,500 | ||
| 27 | Broken Pact | 15 | 1 | 63,000 | ||
| 28 | Smashing | 15 | 1 | 66,500 | ||
| 29 | B.P | 15 | 1 | 70,000 | ||
| 30 | Triumphant Glory | 15 | 1 | 73,500 |
Instance Rewards - Blueprints[]
Usual reward is a ![]() Treasure Box which contains small amount of any of the three resources,
Treasure Box which contains small amount of any of the three resources, ![]() He3,
He3, ![]() Metal or
Metal or ![]() Gold. If you are lucky and repeat the same Instance you will get at some point a Blueprint dependent on the instance level. See the Blueprint section for more information.
Gold. If you are lucky and repeat the same Instance you will get at some point a Blueprint dependent on the instance level. See the Blueprint section for more information.
Other Instances[]
Choose an instance:


