Beep ... beep beep ..., A coded transmission is coming in. The translated message contains a strategic report from one of the front line scouts: The enemy is planning an attack on us. Coordinates of their deployment are ...
Instance Information
Quest: Destroy all enemy warships in this round.
- Max Players: 1
- Max Fleets: 8
- Checkpoints: 1
- Exp: 3220
Commander: Angla
- Stars: 2
- Level: 6
- Speed: 49
Basically, this instance is very easy to win, if done correctly. You need to send at least 7 fleets, 2 of which need to be very strong. My normal fleet consists of ships with Ballistic weapons with a movement of 5 or more. Each fleet has 1800 ships (200 in each slot). So I send in 6 normal fleets, and 2 powerhouse fleets. My normal powerhouse fleet consists of a row of tanks up front, and 2 rows of the fighters I use in my normal fleets. The only difference is that the row of tanks is 1500 strong (500 in each slot, with no weapons, movement of 5, and the rest is shields). These tanks will take a beating and are nearly impossible for the computer to destroy. The other 2 rows of fighters are also 1500+ strong per row (500+ in each slot). What this does is attracts the computer to attack these fleets instead of your others since the most powerful computer fleets will attack the "max durabilty" or "max attack" of your sent fleets. Stat-wise, these powerhouse fleets are higher than the other fleets in every aspect. And with the use of ballistc weapons, they will usually destroy the computer fleets before their weapons have time to cool down and reload. The trick is to have your fleets start in the correct position. If you look at the instance map above, you need to have your powerhouse fleets in positions #4 & #7. If they are not in both of these locations, the strong enemy fleets will attack your other normal fleets and could easily destroy your ships. The position numbers is the order you add them (i.e. the #1 position in the 1st fleet clicked, #2 is the 2nd fleet click, etc).
Here's what your instance fleet should be:
- Normal
- Normal
- Normal
- POWERHOUSE
- Normal
- Normal
- POWERHOUSE
- Normal
If you follow these guidelines, you should have no issue beating this instance without losing a single ship.
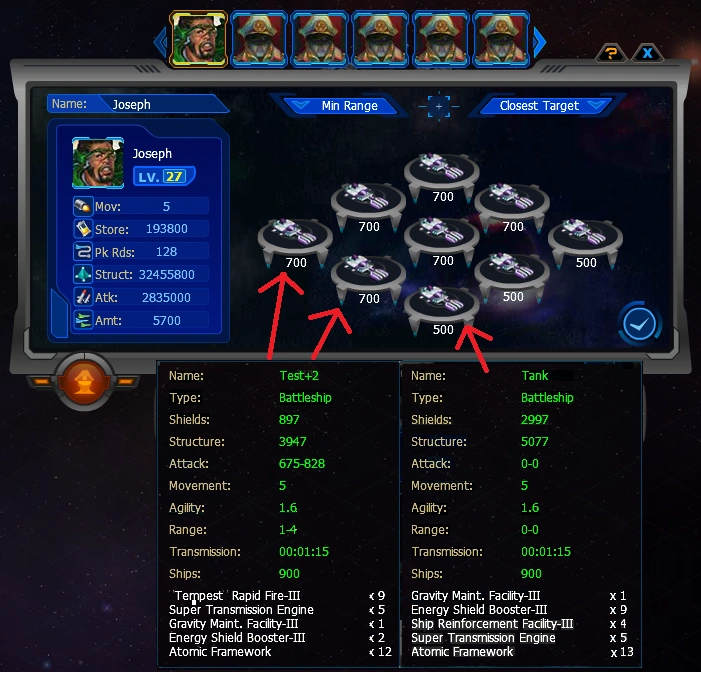
Here is what my "powerhouse" fleet looks like. Test+2 is just my current fighter I used at this point. Yes it's not a very big fleet but for a level 7 instance, this is more than enough.....
Enemy Fleets
Same type of fleets you saw in the previous instance but more of them. In particular two of those pesky ship-based fleets from instance 6. The main difficulty with this instance is your ships start scattered and get attacked from multiple angles so you need stronger side defenses than in the previous instance. Your strongest fleet needs to be able to take at least one direct ship based attack from the side and survive.
Checkpoint
Unknown(Fleet)
- Ships: N/A
- Armaments: N/A
- Defenses: N/A
- Commander: N/A
Reward
![]() Lv 7 Treasure Box: random chance of having one of the following items.
Lv 7 Treasure Box: random chance of having one of the following items.
- Gold
- Metal
- He3
- GoGetter(Blueprint)- Frigate
- The Shuttler(Blueprint) - Cruiser
- RV766 - The Explorer (Blueprint) - Battleship