Countless heroes have come, tried, and failed. Those few who survived walked away with unimaginable riches. Will you be such a legend, or just another statistic?
Instance Information
Quest: Destroy all enemy warships in this round.
- Max Players: 1
- Max Fleets: 8
- Checkpoints: 7
- Exp: 4340
Enemy Units
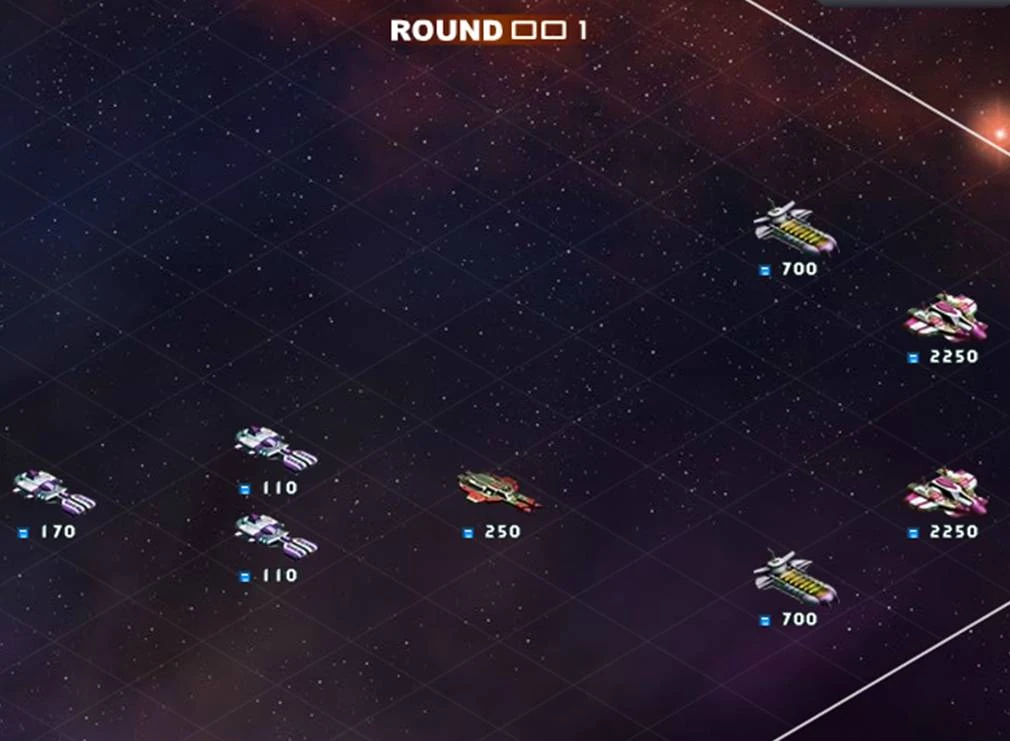
Checkpoint 7
If you were able to take out instance 7 most of the fleets in this instance are repeats. However, the 2x20-ship-based missile fleets and 2x29-ballista fleets are a serious concern. The missile fleet's center row has 180 ships each equipped with a lot of Refined Rocket Frame-III missile launchers. The ballista fleets have serious damage capability in the front row, and all ships in the fleet can reflect up to 25,000 back to the attacking fleet. Most of your fleets that have gotten this far in the instances cannot handle this kind of ballistic firepower. The missile fleet is set to attack your strongest unit, make sure this unit has strong defenses in its front row. The ballista fleet is set to hit the closest fleet, be sure your min-range fleet can handle the heat. Typically your min range fleet will get flanked by one of the ballistic fleets, so ensure your flanks also have strong defenses. Destroy the ballista fleet fast; it gets to shoot every round. Thankfully the ballista fleet has the highest attack, so set your fleets accordingly.
1 x 11-Missle (Fleet)
- Ships: 16 x Diaz-III Battleships in 4 groups (2/2/2/2), 45 Valkyrie-II Frigate in 3 groups (3/3/3)
- Armaments (Diaz):
- Armaments (Valkyrie): 4 x Bingkai roket-I
- Defenses (Diaz):
- Defenses (Valkyrie):
- Commander: Angla-A Lv 6, Lower Range, lower Attack Power
The Valkyries are the missile boats while the Diaz-III ships are simply tanks with a tonne of structure to take hits.
2 x 12-Ship Based (Fleet)
- Ships: 110. 20 Diaz-III in first row cente. 90 x Duke-II in 6 groups (10/10/10/20/20/20). The 20s are in the back row.
- Armaments (Diaz):
- Armaments (Duke-II): 6 x "Hunter" Streamliner-III, 1 x "Hunter" Streamliner-II
- Defenses (Diaz):
- Defenses (Duke):
- Commander: Angla-A Lv 6, Max Range, Max Durability
1 x 15-Missle (Fleet)
- Ships: 250: 100 x Diaz-III Battleships in 2 group (50/50) in the front and back center. 150 RV766-II in 3 groups (50/50/50) in the center.
- Armaments Diaz):
- Armaments (RV766): 6 x "Razor" Missle Pod-III, 2 x "Razor" Missle Pod-II
- Defenses (Diaz):
- Defenses (RV766):
- Commander: Angla-A Lv 6, Max range, Max Attack Power
2 x 20-Ship-Based (Fleet)
- Ships: 700 totally. 300 Diaz-III Battleships in 3 groups (100/100/100) 1 group center front row, and the rest are in the flanks in 2. row. 400 x Watchman-II in 4 groups (100/100/100/100)
- Armaments (Watchman): 4 x "Nomad" Streamliner-III, 2 x "Hunter" Streamliner-III, 2 x Golem-III, 2 x Streamliner-III
- Armaments (Diaz): None
- Defenses(Diaz-III):
- Derenses(Hunters):
- Commander: Angla-A Lv 6, Max Range, Max Attack Power
2 x 29-Ballista (Fleet)
- Ships: 2250 Totally. 750 Devourer-III (250/250/250) Front row. 500 Timat-III (250/250) middel row flanks. 1000 Encratos-III (250/250/250/250).
- Armaments (Devourer):
- Armaments (Timat):
- Armaments (Encratos):
- Defenses (Devourer):
- Defenses (Timat'):
- Defenses (Encratos'):
- Commander: Jerome-A Lv 6, Lower Range, lower Attack Power
Reward
Lv 8 Treasure Box: random chance of having one of the following items.
- Gold 15-20k
- Metal 15-20k
- He3 15-20k
- Ship-based Air Interception Cabin (Blueprint)
- Agility Booster (Blueprint)
- Space-Time Magnetic Shield (Blueprint)